
 English (United Kingdom)
  Czech (Čeština)
  Nederlands (nl-NL)
  Magyar
  Deutsch (Deutschland)
  Croatian (Hrvatski)
  Polski (PL)
  Español (España)
 Learn about Trapping
To learn how to be a Trapper and contribute camera trap image data to MammalWeb, you can refer to our video about How to be a Trapper. If you are already an experienced camera trapper, you can jump straight to the information about how to upload your data. Otherwise, we suggest you read the following before embarking.
Recording image data: getting started with your camera trap
There are many different models of camera traps (or “trail cameras”) available now and the settings for each one may differ slightly. If you are borrowing a camera trap from MammalWeb then it should already have the correct settings - but it is still important to check them before heading out into the field! If you are using your own camera trap then we’d advise you to set your camera to the settings listed below. Each camera may differ slightly in the settings options but all should be set to the following where possible.
Settings for camera traps:
- Set to take images or videos. Many cameras will take images and videos but we don't want lots of duplicate data in the database. Still images typically use less memory and induce less battery drain. However, you might have good reasons for using video data. In that case, we only ask that you do not use 'ultra' definition video, as files tend to be very large and expensive to store (if you have large files, >50MB, please contact us first, as they might exceed the upload limit for the site). If you do use video, please note that mp4 is much preferred to the avi format. avi videos do not display in a uniform way on all browsers. In addition, avi files vary in how they store the original timestamp. For that reason, avi files must be renamed before upload (see our FAQs page).
- Set time and date correctly for your location. You should periodically check both the time and date on your camera. Also note that many cameras will show the date in the American format (i.e., month, day, year).
- Set images to record in sequences. Many camera models will give the option to take multiple images every time the sensor is triggered. We recommend you set this to three (or more), as single images often make it very difficult to detect the wildlife pictured.
Please remember to switch the camera off before inserting or removing the memory card – failure to do so may corrupt valuable data!
When picking a location for your camera trap, please:
- Avoid places with lots of human activity – it might be stolen, and we don't want countless photos of people walking by!
- Ensure the camera's field of view is unobstructed, taking into account any future plant growth.
- Make sure you can attach the camera to something substantial like a tree trunk or fence post that will not wave around in the wind.
- Make a judgement about your camera's height based on the specific circumstances of your location. 30 - 120 cm is usually a good range for most wildlife and circumstances, with the exact height depending on the terrain and vegetation. However, there might be reasons to put the camera higher or lower. Carefully record the height of your camera.
- Do not place the camera too close to a track, hole, or fence. It should be at least 1 to 2 metres away from where animals are likely to pass.
- Angle the camera down very slightly so small animals can be photographed. You might need to wedge a stick or small rock behind the top of the camera. Do not angle the camera upwards! At the very least it should be parallel to the ground.
- Avoid pointing the camera directly east or west so it won't get the glare from the rising/setting sun.
- Don't place the camera on the bank of a beck or river that is liable to flood. Most cameras are waterproof against rain but not against being submerged!
Once you have set up the camera, before you leave please:
- Confirm the batteries have plenty of remaining charge.
- Confirm the memory card is empty.
- Confirm the camera is active, and is not in motion test or walk test mode (although these are OK if you are using a camera that automatically arms itself after a period of inactivity).
- Make sure all fastenings are tightly closed so water doesn't get in.
- Ensure the camera is fully secured/locked whenever possible.
- Carefully record the exact time and date when you deployed the camera. This may not be when the first photo gets taken.
When you revisit to check your camera, please:
- If possible, take fully charged batteries and an empty memory card with you, so you can swap them on the spot and you won't have to make two trips.
- Double check that the time and date are still correctly set on the camera. Remember: the time and date format may vary depending on the camera model; please be extra careful!
- Carefully record the exact time and date when you check your camera to replace batteries/memory card. This may not be when the last photo was taken.
When downloading photos to your computer and uploading images to MammalWeb, please:
- Remember to delete photos from the memory card after they have been transferred to your computer.
- Format your memory card regularly, but make sure you get all the photos first!
- Upload a maximum of a couple of hundred photos at a time. You can upload more, but it might slow down your computer.
Uploading your image data to MammalWeb:
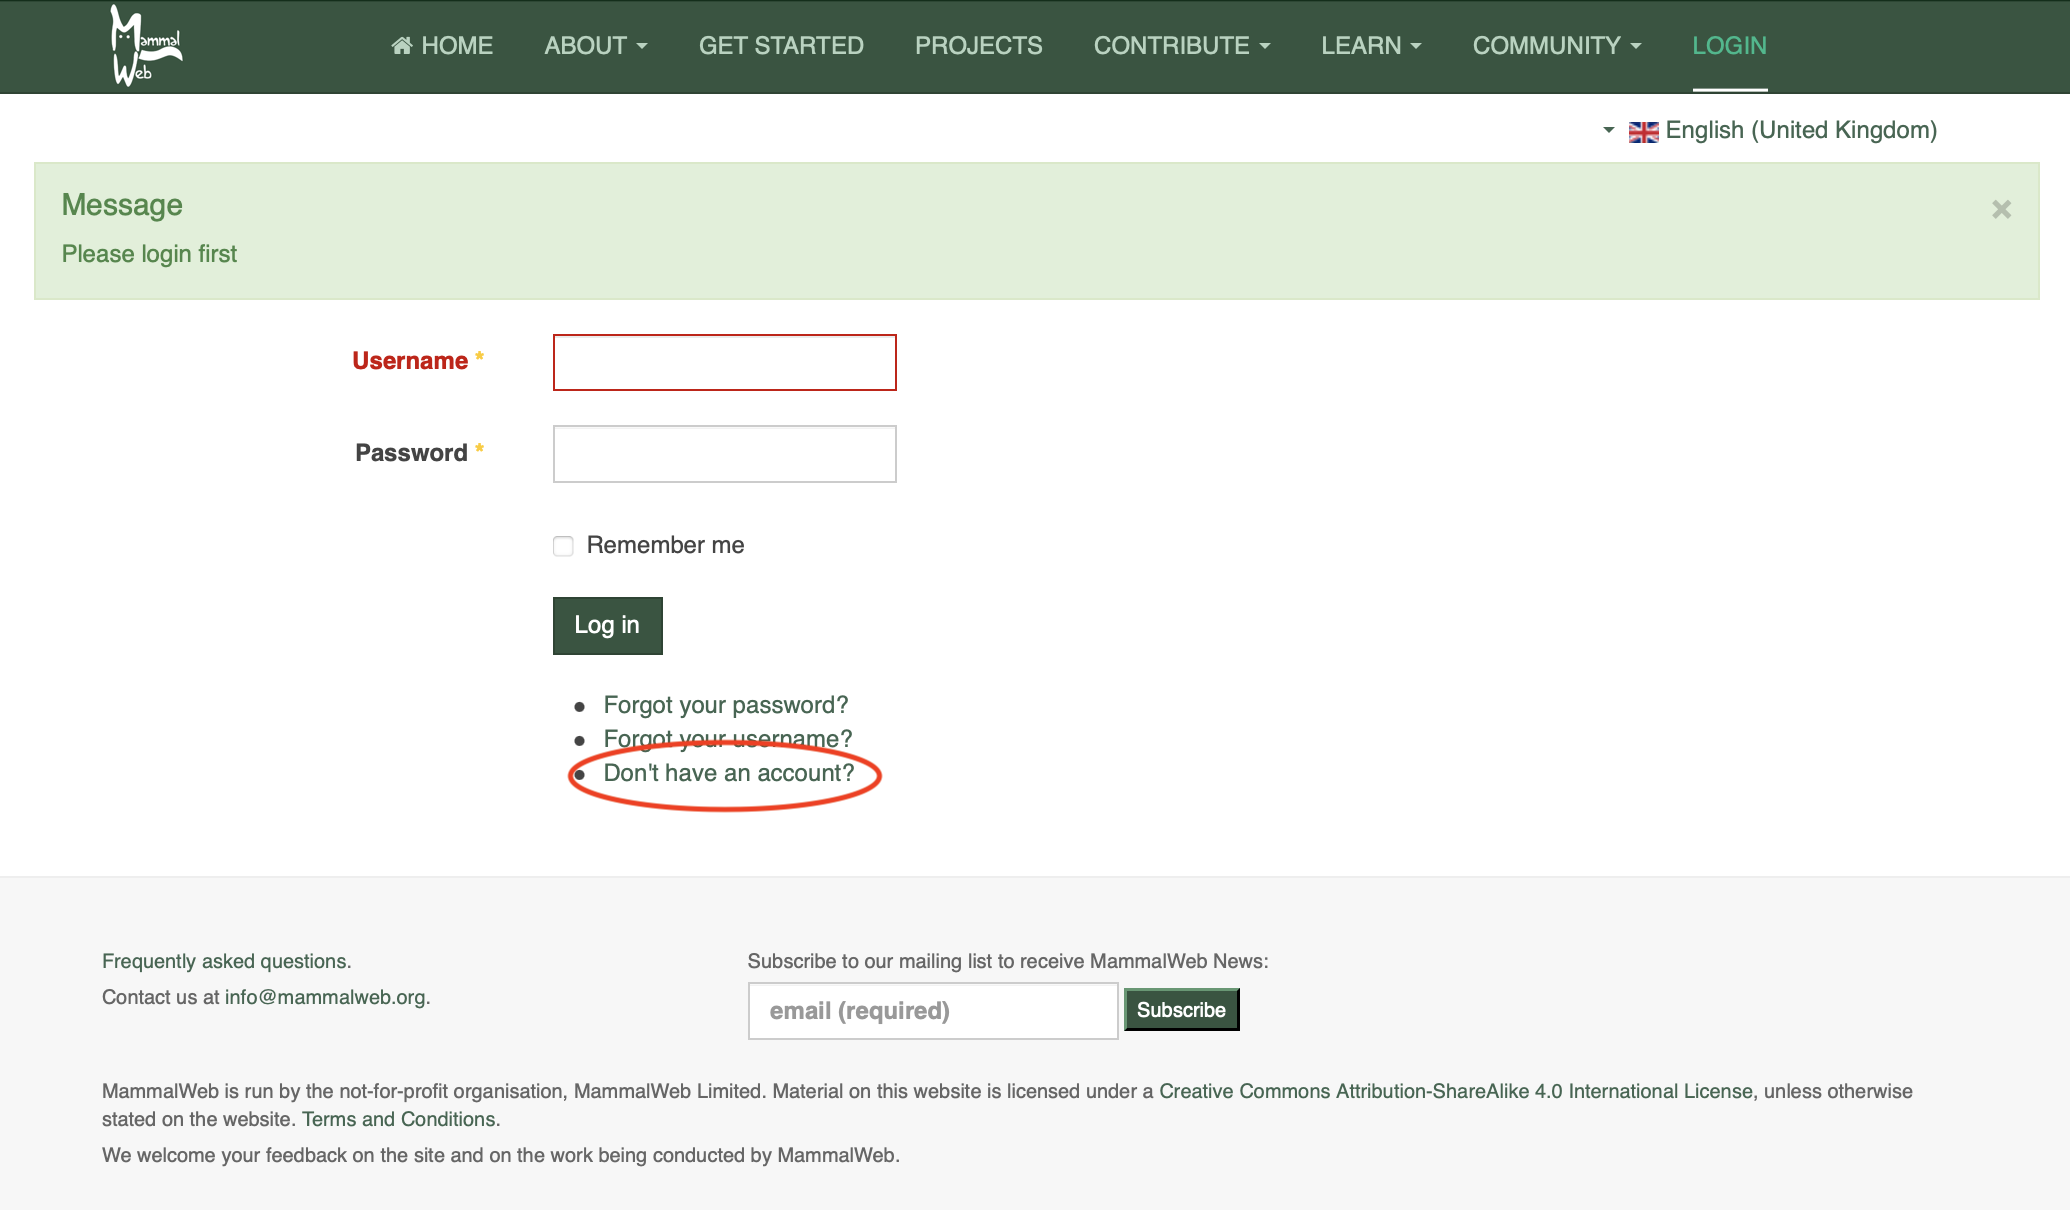
To upload data as a Trapper, you need to register an account. You can do that via either the Spotter or the Trapper screens (both accessed using the Contribute menu item at the top of the screen) the first time you visit them. You will need to follow the link “Don’t have an account”, highlighted below.
This will take you through to the registration page. Fill in the details required and click on “Register”. For more information, see our video about How to Register.
Once you have an account, you can log in. By following the Trapper menu item (under Contribute on the menu bar), you should see a Trapper screen like the one pictured below. Each location at which a camera trap is deployed is known as a 'site'. When you move your camera to a new location, or change the camera or its set-up at its current location, this counts as a new site. When you set your camera to record images or video, this counts as a deployment. Each time you visit your camera and collect the image data, then re-start the camera to trap more image data, this counts as a new deployment.
The Trapper screen will list all the sites you have set up. Obviously, the first time you visit the Trapper page, it will have no existing sites listed.
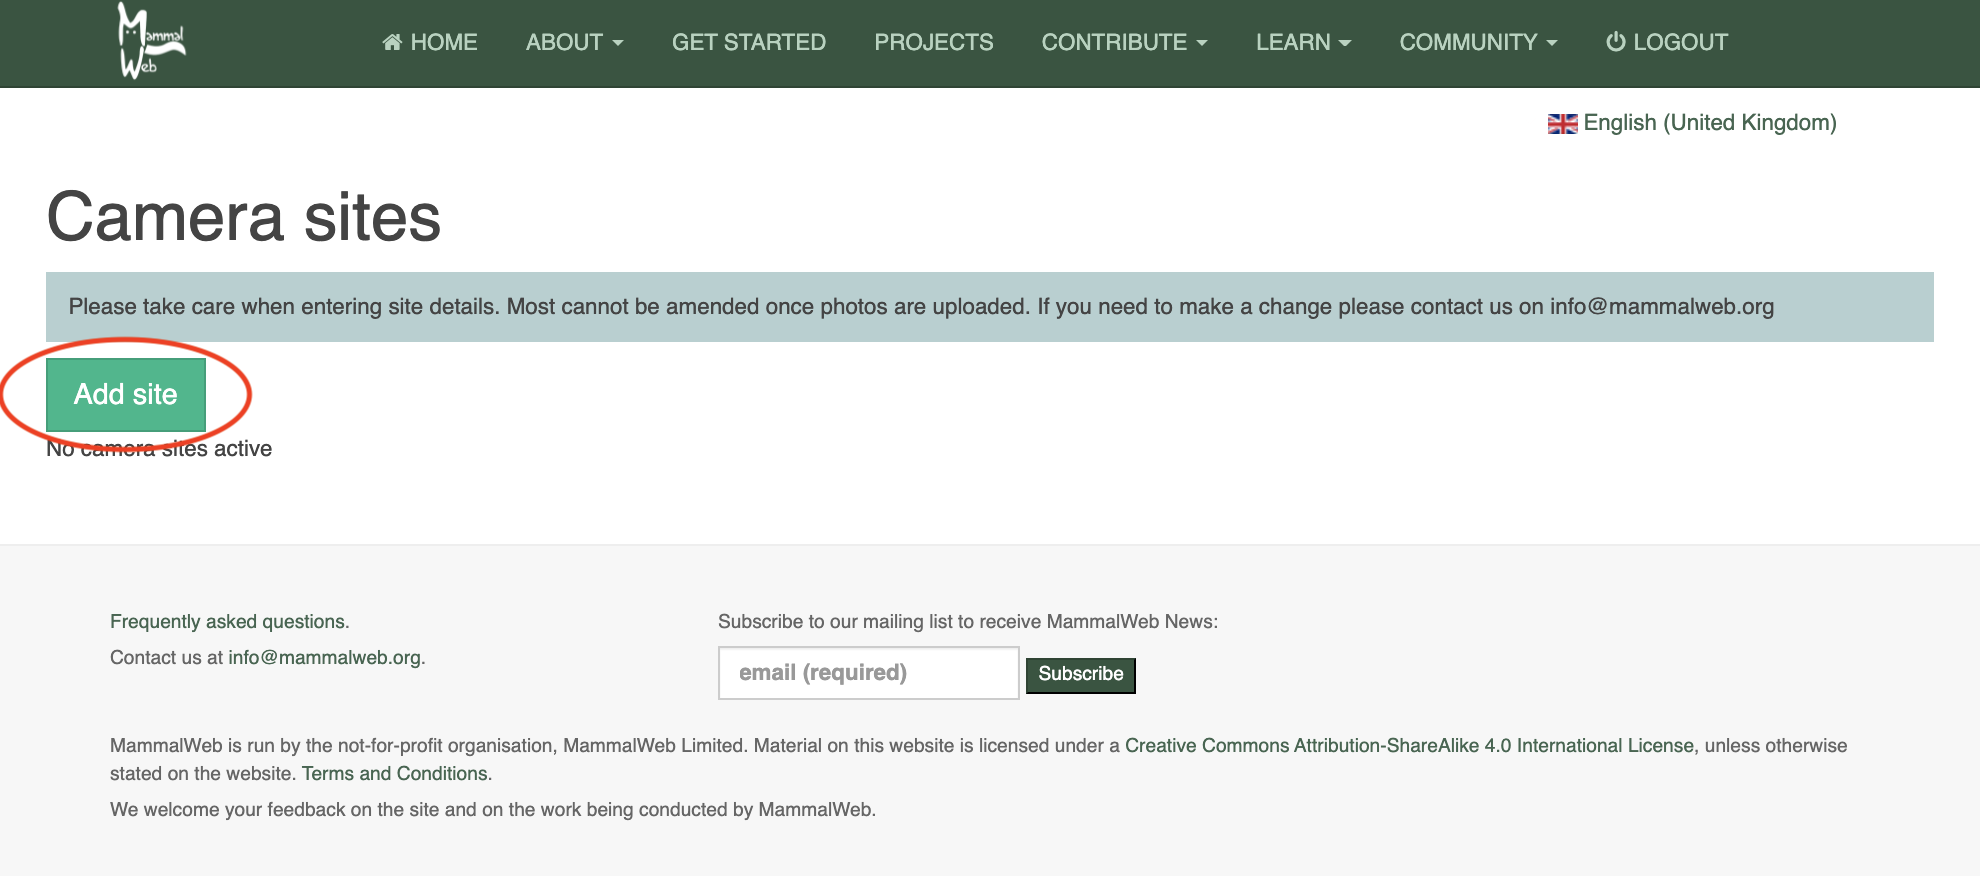
The first thing you’ll need to do is add a new site by clicking the button within the red ellipse, above. This will initiate the Trapper wizard, which will guide you through entering the required information for a new site. It should be self-explanatory but, so you are prepared, you will need the following information:
- Site name - Choose a name by which you can recognise this site.
- Site location - you can enter this in one of 3 ways. First, you can click and drag the pin on the map. If you do that, please zoom into the map to ensure the location is reasonably accurate. Second, you can enter the Latitude and Longitude of the site. Many smartphones have freely-available apps that will allow you to find the Lat & Long of your location. Finally, in the UK, you can enter an OS Grid Reference. Grid references are in the form NZ 27623 41214. If you are entering a grid reference directly (rather than from the map), please ensure that you enter at least 8 digits after the 2 letters at the start.
- Habitat – A drop down box will show habitat options, choose the one that best describes the immediate surroundings (say, within 10m or so) of where your camera is located.
- Can you or the camera see water? – Choose option from the drop down box. This question relates to the locale of the camera. Obviously, if you are on high moorland and can see the sea 20 miles away, that is relatively unimportant to explain the pictures obtained. However, if you are on the coast, or close to (say, within 20 m of) a pond, lake or river, that is likely to have a strong bearing on the animals pictured.
- Purpose of Study – A drop down box will show available options; if you are not part of a larger study, and are deploying the camera for your own interest and contribution, choose ‘Private Use’.
- Camera Type – A drop down box will show camera models; please choose the model you are using. If your model is not on the list, please get in contact to let us know and we can add it on.
- Camera Height – Please estimate in centimetres the height of your camera off the ground.
- Projects – If you are part of a camera trapping project, (this could be within a school or organisation) then you will have the option of choosing to upload to that project here, by clicking the dropdown box and choosing your project. If no project is selected, your images will automatically be uploaded to ‘MammalWeb Britain’.
- Bait - please choose an option from the dropdown list (and, if your site is unbaited, choose 'None').
- Time of day - please choose an option from the dropdown list; typically, we expect that most cameras will be active both 'night and day'.
- Notes – Any notes you want to leave about this particular camera site. If you borrowed a camera trap from MammalWeb, you can enter the camera trap number here.
If you are unsure about any of the options, you can leave them and fill them in (using the 'edit' button, highlighted with a red ellipse in the picture below) after you have checked. Notice, however, that most of the fields (apart from Site Name, Notes and Projects to which the site is attached) cannot be altered once you have uploaded photos from that site. If any of the site’s other properties have been entered incorrectly, you can let us know (at This email address is being protected from spambots. You need JavaScript enabled to view it.) and we will make the corrections.
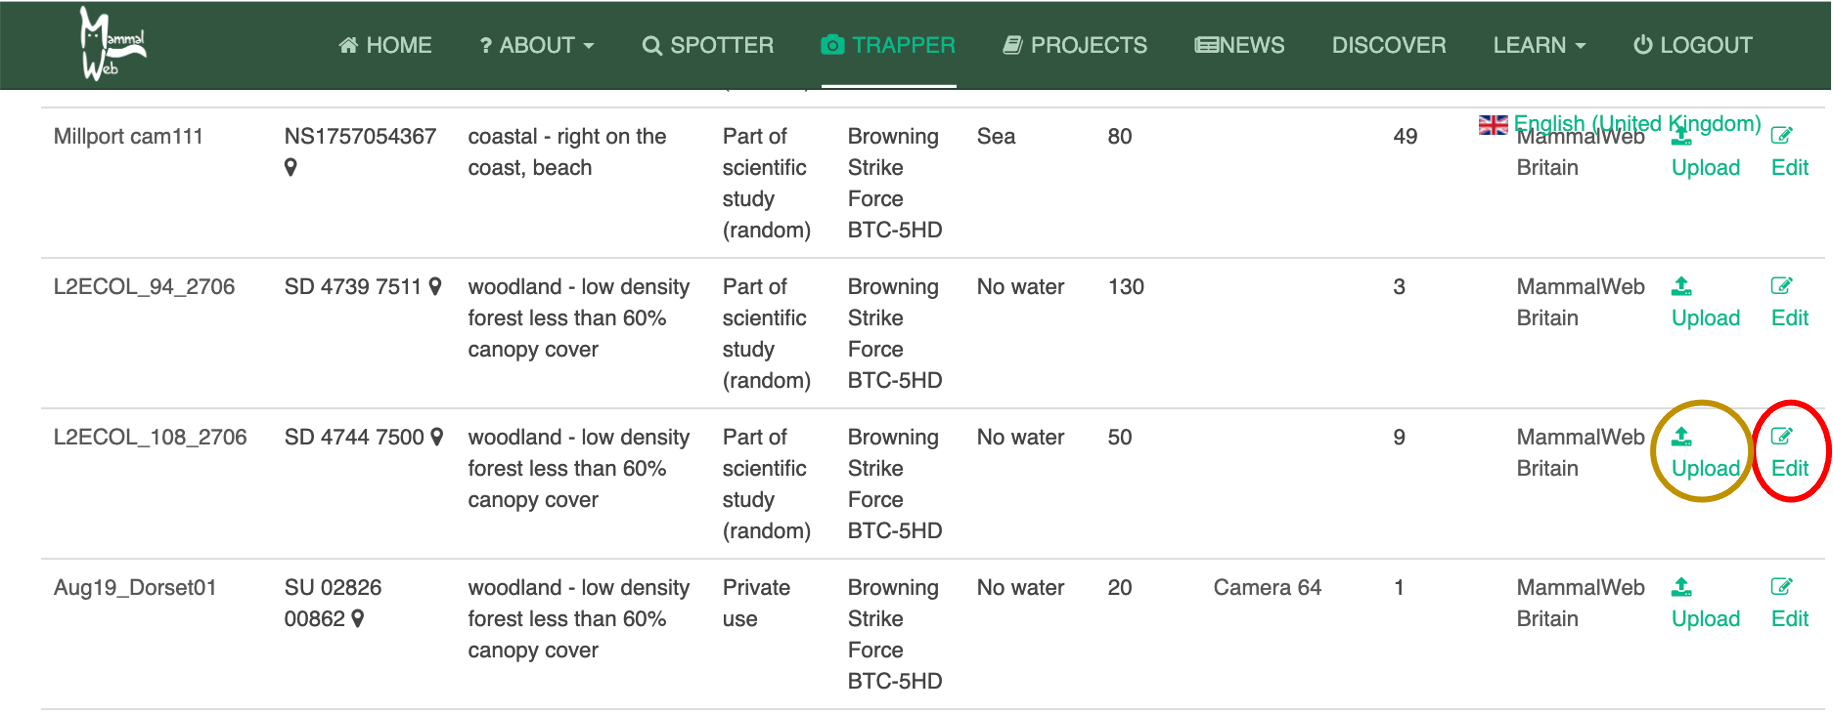
Once you have set up a site, click on Upload (red see gold ellipse in the picture above) and you will go to the page shown below, where you can enter the start and end dates and times for the period of the deployment for which you wish to upload data. This is the date/time you set the camera up and the date/time you removed the SD card. Notice that times are given to the nearest 15 minutes. Please ensure that you set the correct timezone and also indicate whether the times on the camera were set during the daylight savings period. Once you have entered the dates and times, click on Upload and a screen will appear, inviting you either to drag and drop the images to the box or, by clicking on the Upload button, to browse to the folder on your computer where you have stored the images.
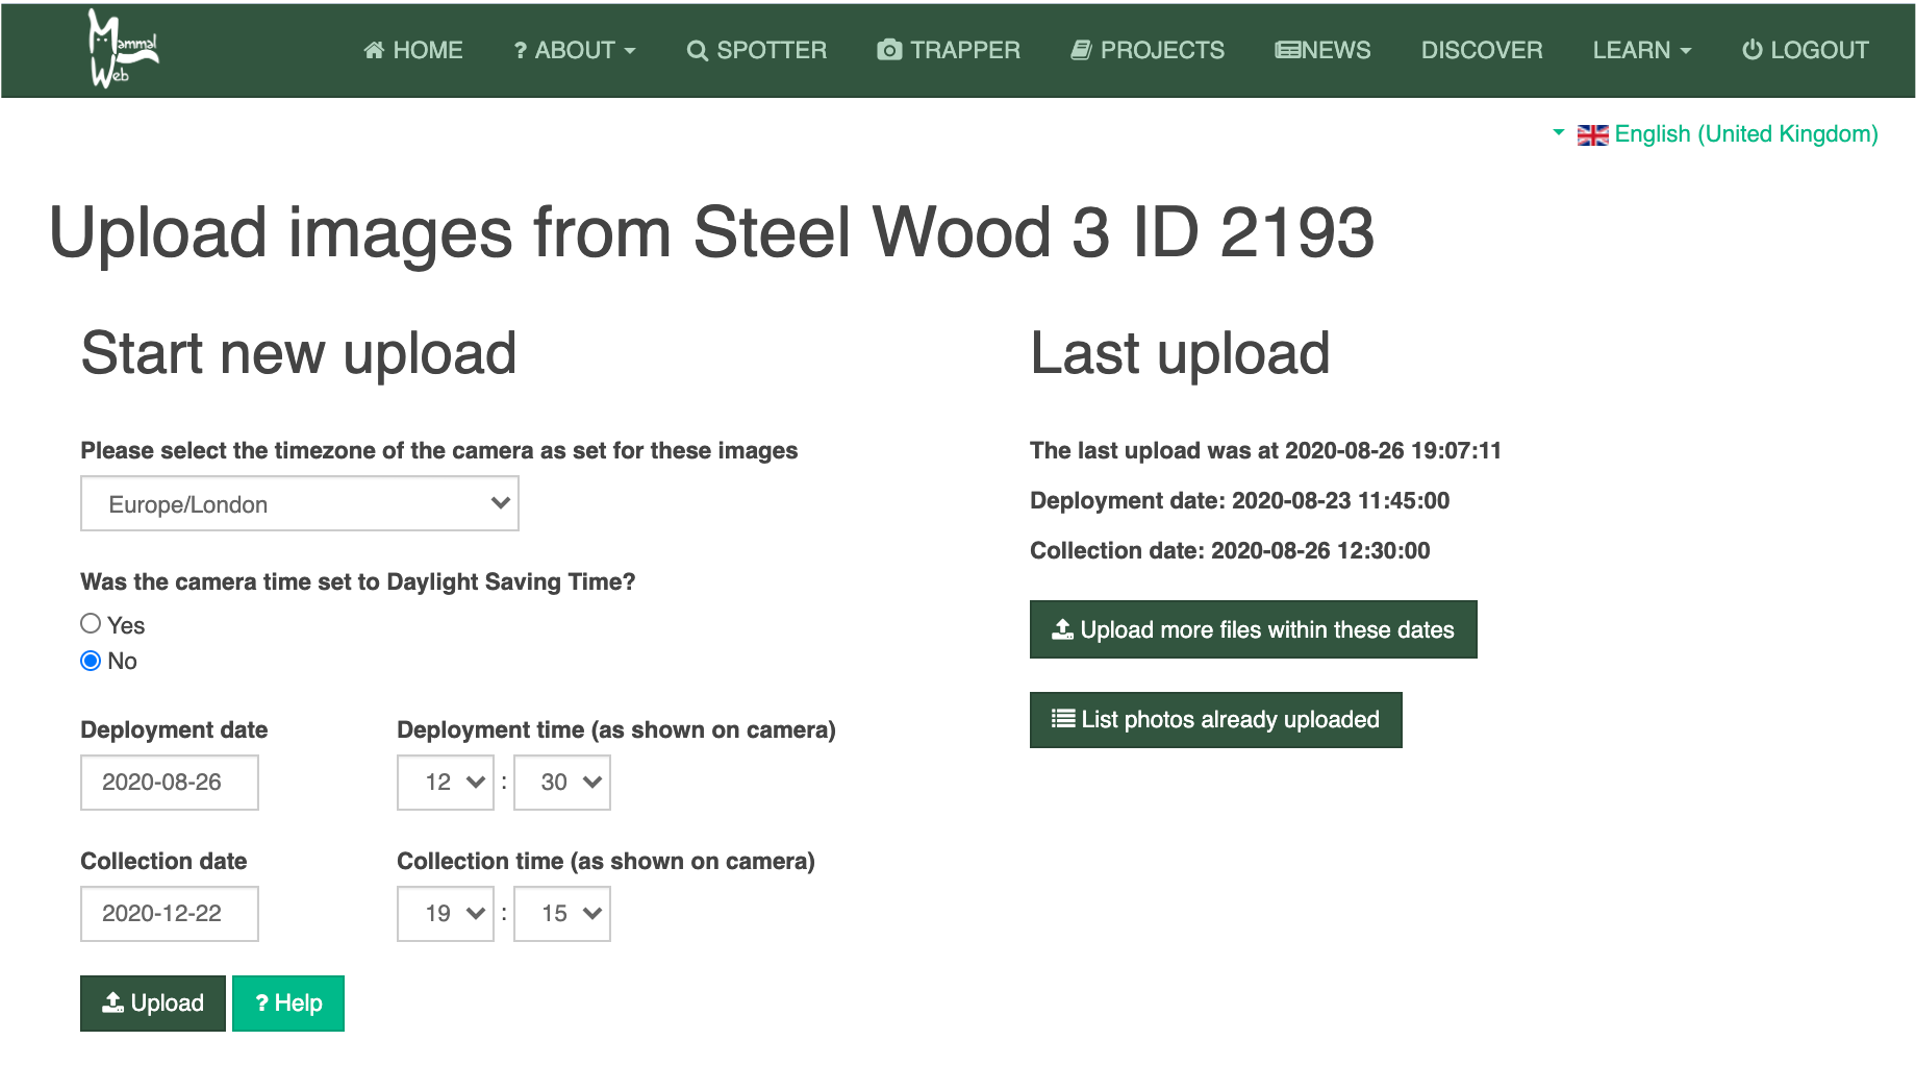
Notice that if you have previously uploaded image data from this site, you will be offered the chance to upload more images from between the same dates and times (i.e., from the same deployment). This is helpful if you want to upload images from a single deployment in smaller batches, to avoid overwhelming your internet bandwidth. In those circumstances, the default deployment date and time are set as the collection date for the previous deployment, on the basis that many people simply change the batteries and SD card and then immediately redeploy a camera at a given site.
Uploading can take some time, depending on the speed of your internet connection. Once the upload has completed, please check that all the images have uploaded correctly. Once the upload is complete a list of the files that have successfully uploaded is displayed – but you will also be notified if there have been any errors.
Please upload all the images you obtained to MammalWeb and let the Spotters classify them all! At present, we don’t advise that you omit photos with humans in (because human use of an area might be an interesting driver of other species’ presence and absence) or that you think are blank (because sometimes other people spot something that you can miss). The exception to this advice is if you know that your camera has been triggered repeatedly by waving vegetation. If that has happened, we ask that you avoid uploading large numbers of images or videos of vegetation waving in the wind! We are working on methods to automate dealing with humans or nothing of interest, which will allow us to make use of this data, without burdening Spotters with an excess of uninteresting images.
Once all your photos have been uploaded, clear your memory card. You will then be ready to redeploy your camera!
If you have any questions or suggestions, please contact us at This email address is being protected from spambots. You need JavaScript enabled to view it.. Otherwise, thanks – and happy trapping!
Learn about Projects
On MammalWeb, the default is for images to be attached to MammalWeb Britain. However, individuals, community groups or larger organisations might have reasons to want to view and manage their image data and classifications independently. This might be because their cameras are set up in a particular way, capturing different kinds of wildlife, or it might be because they want to enlist the help of a specific group of Spotters to help with classifications for a particular purpose. In addition, it might be desirable to have private collections of data, visible only to those who have been given access. In these cases, it makes sense for all image data collected for those purposes to be grouped as a separate Project on MammalWeb.
If data are grouped within their own project, Spotters can selectively classify only those data, whilst records of the uploaded data and associated classifications can be grouped together and exported separately from other data in the database.
The project structure on MammalWeb has implications for 3 activities: Spotting, Trapping, and Project administration.
Projects and Spotting
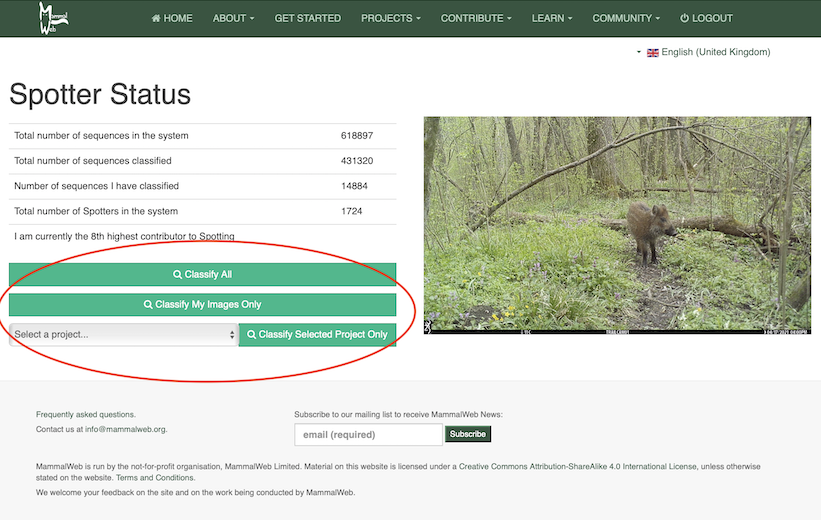
When spotting, you can choose between different projects for which you can contribute classifications. Specifically, the Spotter welcome screen has a set of buttons that allow you to select the set of images you would like to classify. That is highlighted in the picture below with a red ellipse. To learn how to be a Spotter and classify camera trap image data on MammalWeb, you can refer to our video about How to be a Spotter.
You can choose to classify any publicly-available images in the database (“Classify All”) or those from a specific collection within the overall database (in which case, you will need to select a project from the drop-down list, and choose “Classify selected project only”). Note that you can also follow the Projects link in the top menu bar to browse projects to which to contribute classifications. If you are also a Trapper and have already uploaded some images, you might like to “Classify my images only”. Note, however, that it usually takes 10 minutes or so before images you have uploaded are ready to be classified.
Projects and Trapping
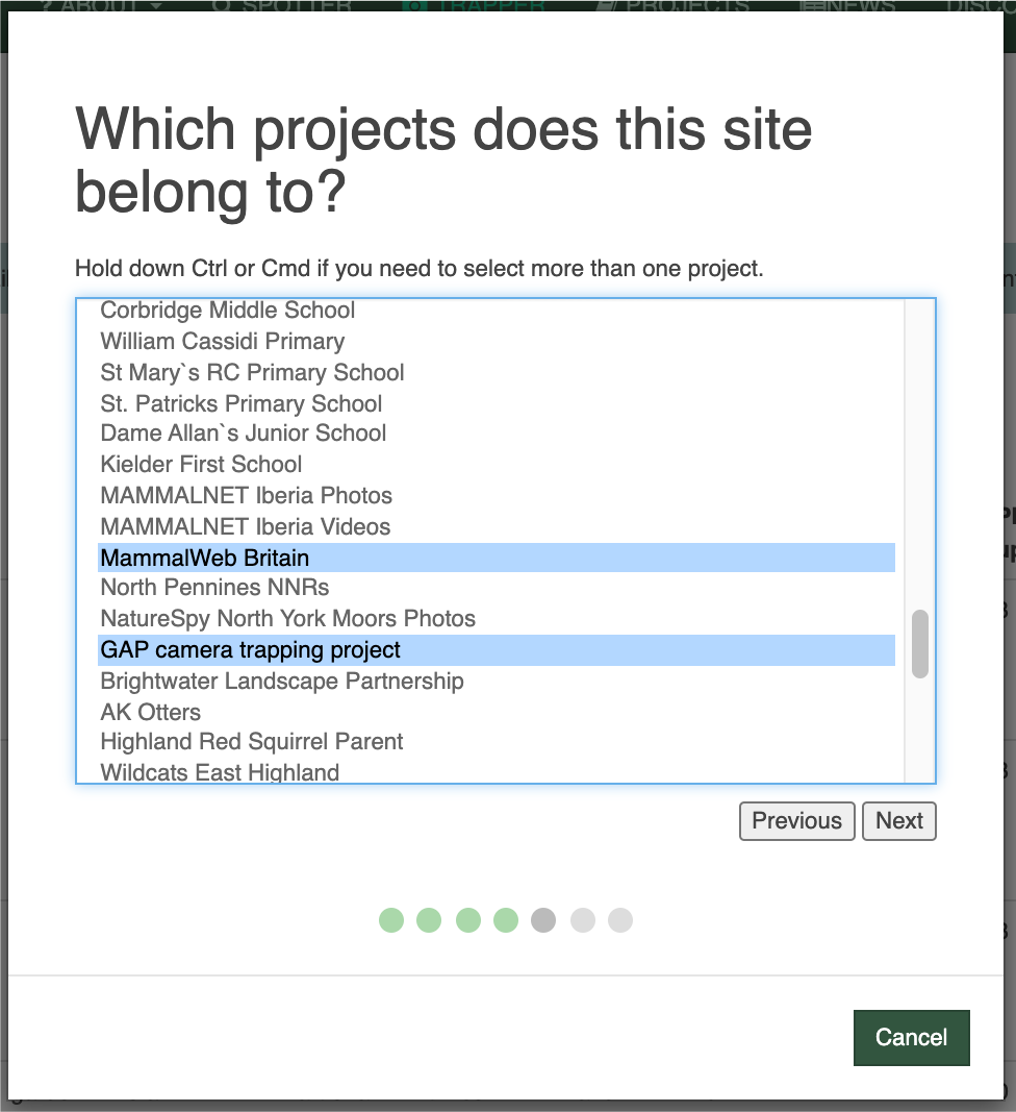
Trappers are those who own or borrow camera traps to collect image data in their area. Each location at which a camera trap is deployed is known as a 'site'. More on this can be found in our video on How to be a Trapper. In brief, when a Trapper adds a new site, along with details such as the site name, location, camera type, etc., they are also asked to specify to which project(s) the site will belong. All sites, by default, are linked to MammalWeb Britain. However, you can change this at the relevant point in setting up your site (see picture, below) by selecting alternative projects to which to link your site. You can select more than one affiliation for your site by holding down CTRL (on a PC) or CMD (on a Mac) whilst you click to select the relevant projects.
Project administration
The MammalWeb team currently take care of basic project administration. We set up new projects, as required. Project administrators can then grant users access to those projects, if necessary. By default, all users are members of all public projects; however, some projects are restricted and require access to be set up. Users should contact us on This email address is being protected from spambots. You need JavaScript enabled to view it. if they would like to join a project to which they do not currently have access.
If you would like to set up a project on MammalWeb, please see our Frequently Asked Questions page and then get in touch.
If you have any questions or suggestions, please contact us at This email address is being protected from spambots. You need JavaScript enabled to view it.. Otherwise, thanks - and we hope this has been helpful!
Learn about Spotting
To learn how to be a Spotter and classify camera trap image data on MammalWeb, you can refer to our video about How to be a Spotter. More details follow.
To be a Spotter, you need to register an account. You can do that via any item under the Contribute menu, the first time you visit any of the links under that menu. You will need to follow the link to “Don’t have an account”, highlighted below.
This will take you through to the registration page. Fill in the details required and click on “Register”. For more information, see our video about How to Register.
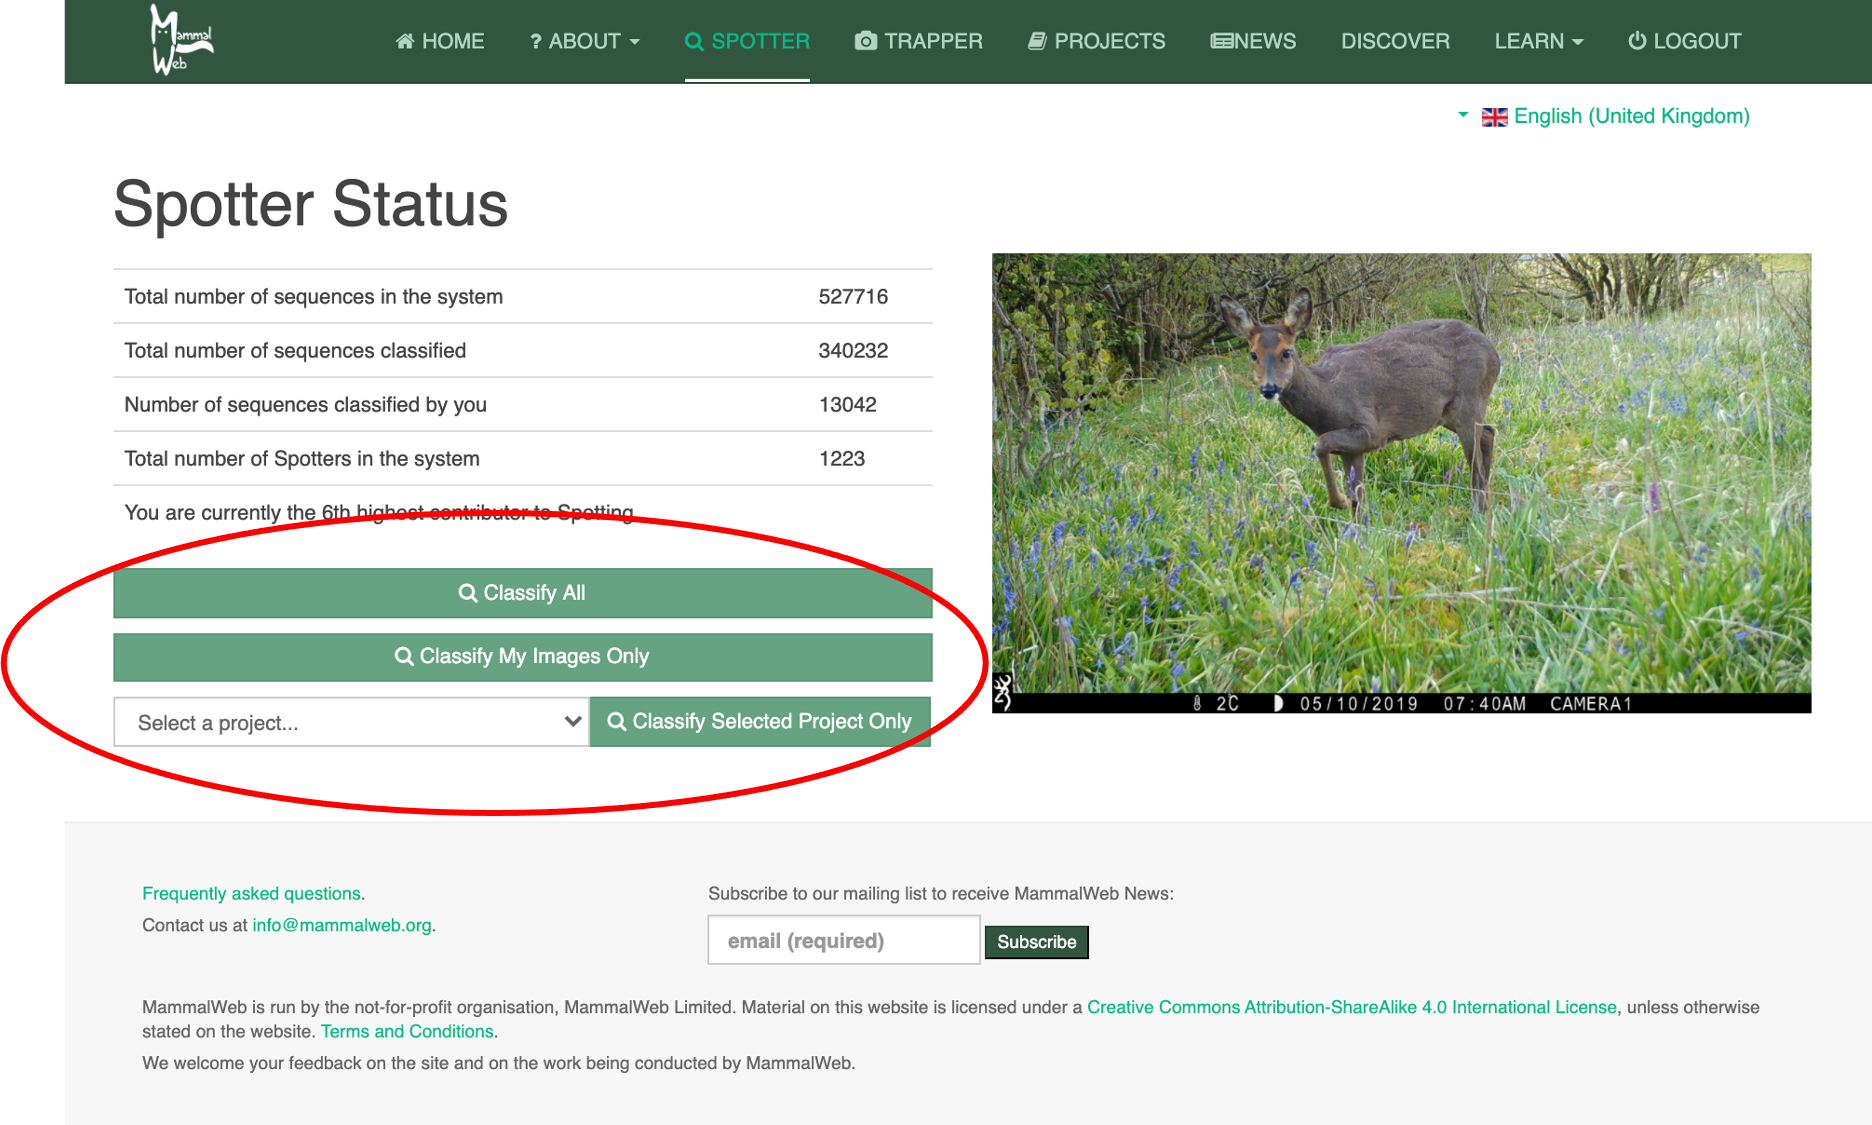
Once you have an account, you can log in. You should see a Spotter welcome screen like the one pictured below. This gives some basic statistics on the number of photos and Spotters in the system, as well as some indication of your contribution (the number of classifications you have submitted, for example). There will also be an image chosen at random from among those that you have “Favourited” (or, if you have yet to “Favourite” an image, from a default list). That image will vary among visits, especially as the number of photos you have “Favourited” increases.
The most important feature of the Spotter welcome screen is the set of buttons that allow you to select the set of images you would like to classify. That is highlighted in the picture with a red ellipse.
You can choose to classify any publicly-available images in the database (“Classify All”), only those that you have uploaded (“Classify my images only”), or those from a specific collection within the overall database (in which case, you will need to select a project from the drop-down list, and choose “Classify selected project only”). Note that you can also follow the Projects link in the top menu bar to browse projects to which to contribute classifications. More information about projects and project access can be found on the Learn page. If you are also a Trapper and have already uploaded some images, you might like to “Classify my images only”. Note, however, that it usually takes 10 minutes or so before images you have uploaded are ready to be classified.
Whichever option you choose, the Spotting process is the same. It starts with a screen like that pictured below. The question posed on the Spotting screen is “What do you see in this sequence?”. Many camera traps are configured to take a series of photos whenever they are triggered. These naturally form a sequence, usually of one or a group of animals. Sometimes, the same animal(s) may cause the camera trap to trigger repeatedly; MammalWeb assumes that these images will feature the same animal(s), and so will group them into longer sequences. It is also possible that some media are uploaded as videos, so a video might appear in the frame in which the photos normally appear. We are interested to know how many animals and of what species are pictured in any sequence or video.
To determine what’s in the sequence, you can flick through it using the keyboard arrow keys, the ‘advance’ and ‘go back’ indicators (labelled A in the picture below), or the ‘sequence length’ indicators (labelled B below). To zoom in to the image and view it full-screen, use the zoom tool labelled C. To get a better idea of where the picture was taken, click the Location button (labelled D). Take a careful look at the images and satisfy yourself that you know what’s pictured, how many there were and – if possible – their sex and age (only given as adult or juvenile; the latter can be used for clear “young of the year” for many mammals – but don’t use it if you are uncertain).
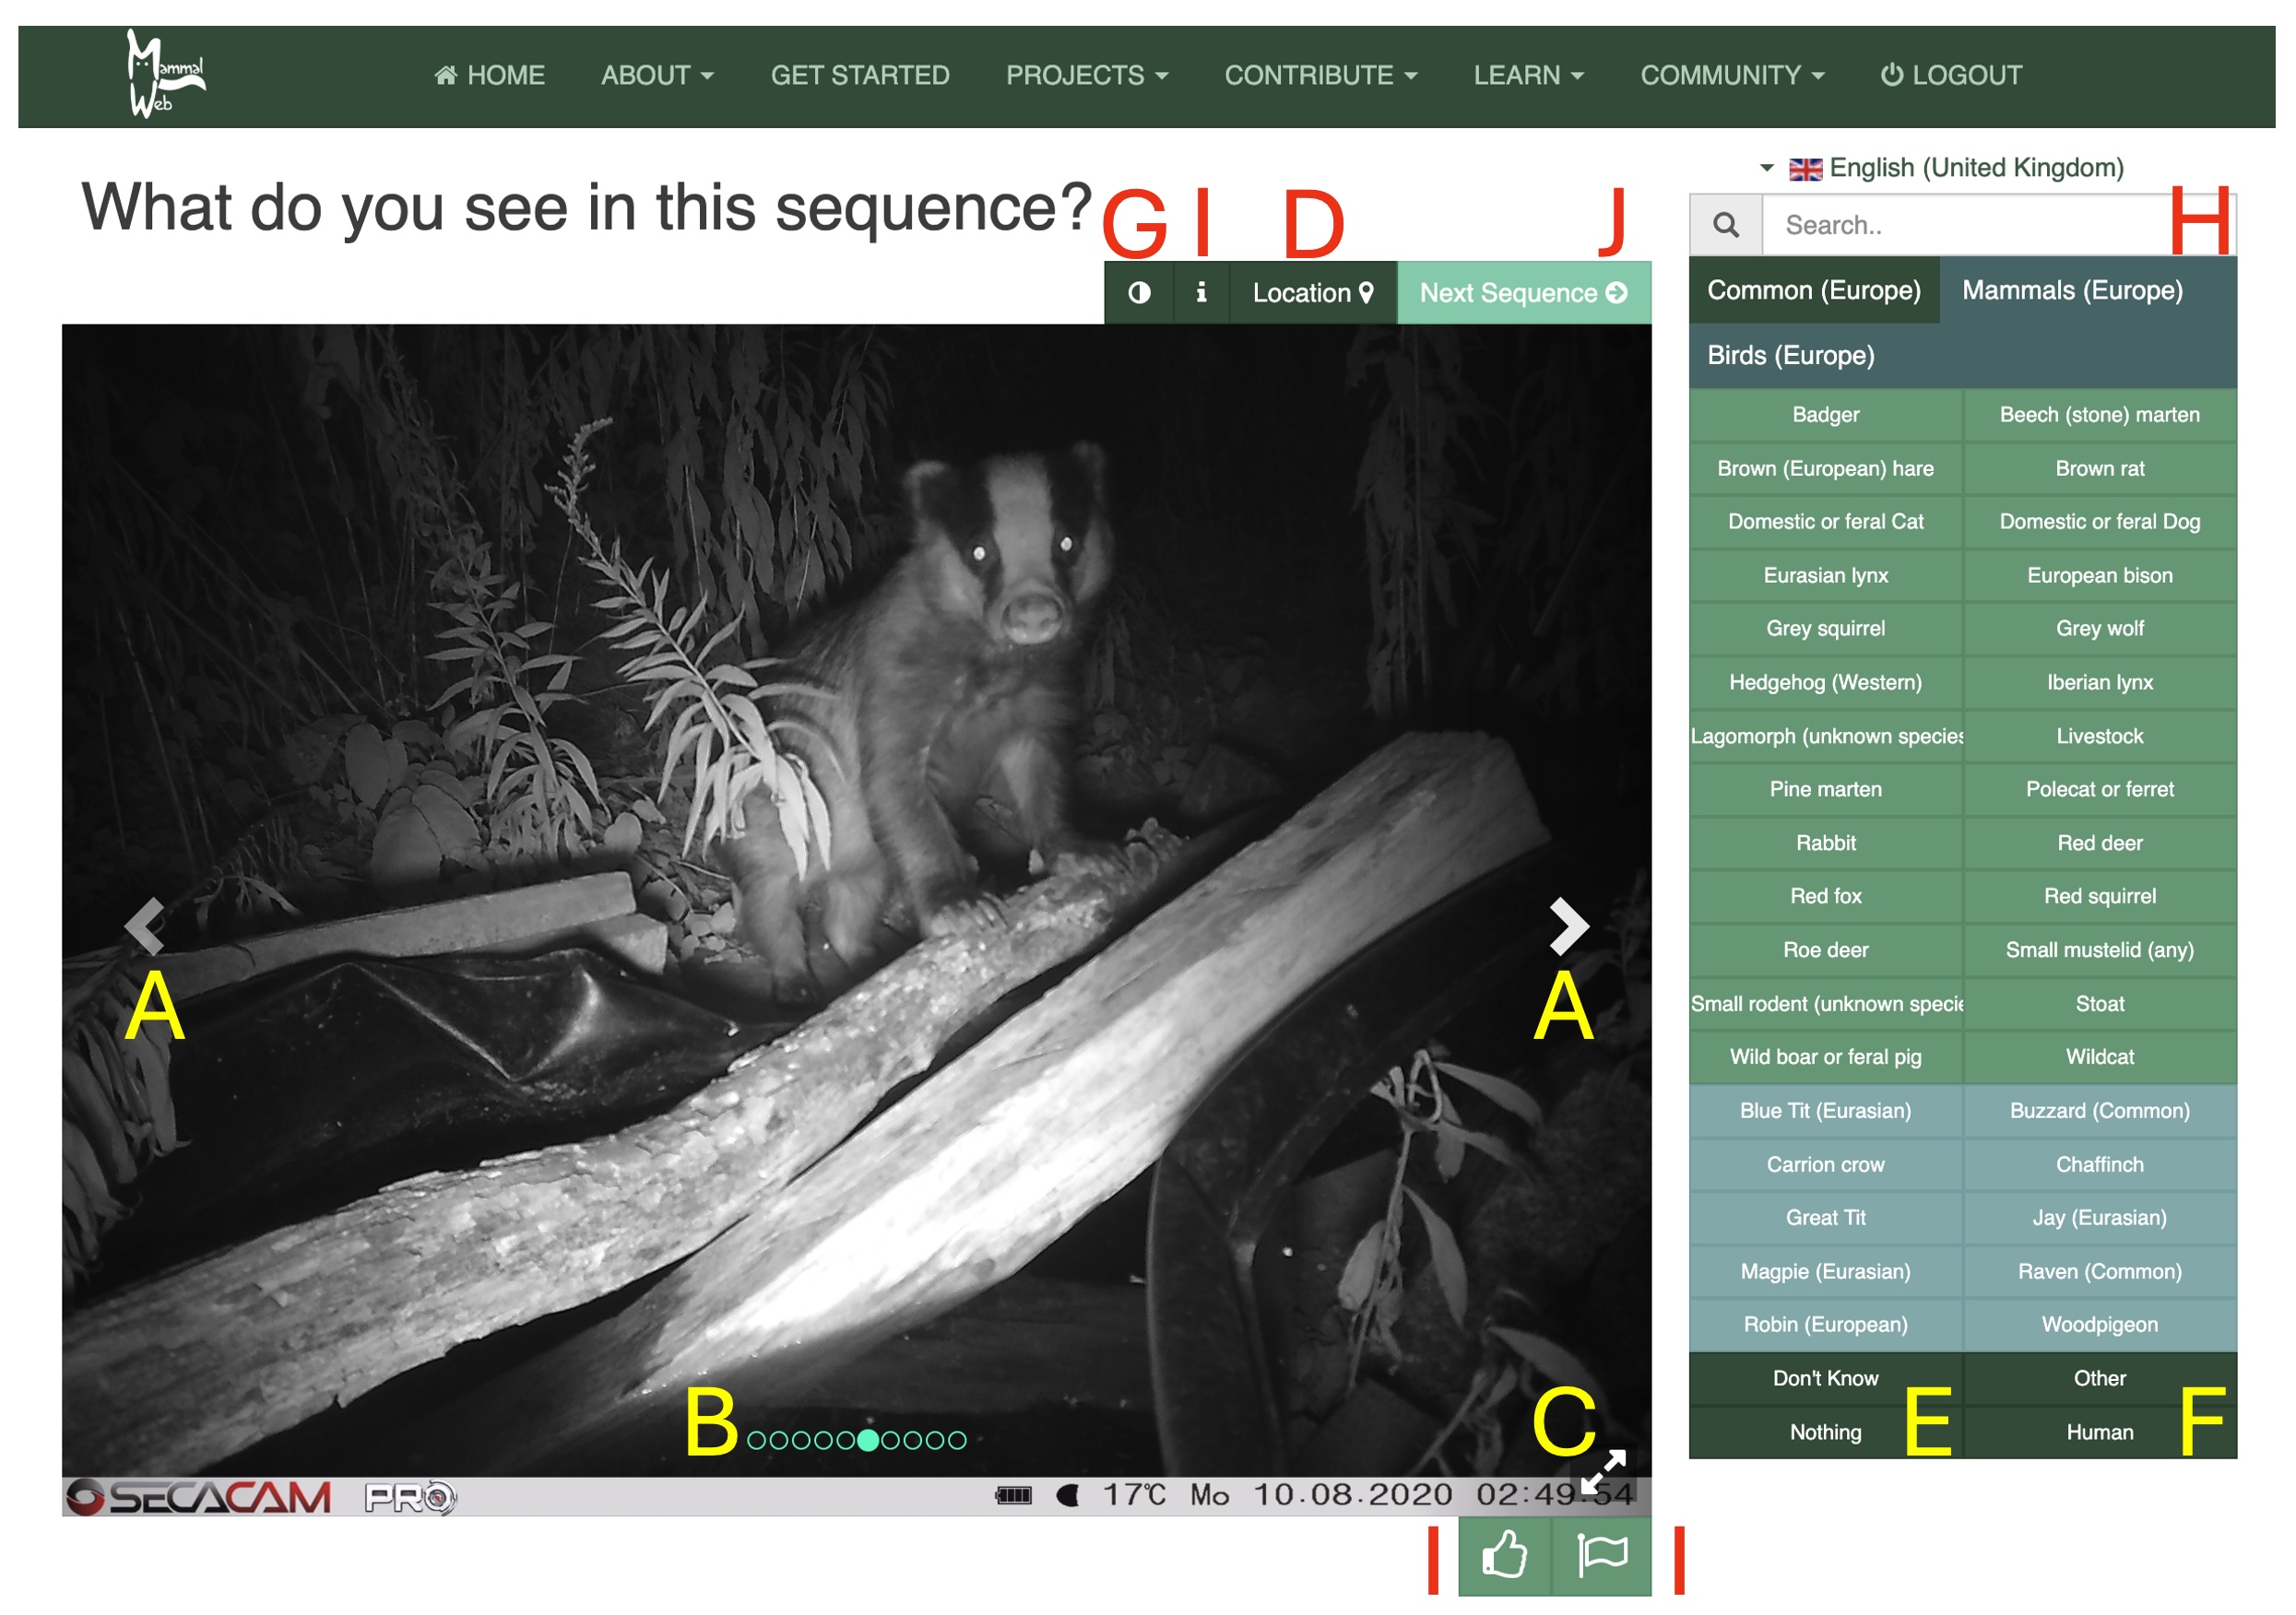
If the image sequence contains no wild or domestic birds or mammals, or if the sequence contains a human being, please use the “Nothing” or “Human” buttons at the bottom right (labelled E and F) to identify that. Images containing humans will not be shown again once they have been flagged. Sometimes, it can help to pick out the outline of an animal if you invert the colour / grey-scale balance in a picture; you can do that using the button labelled G. Assuming there is a wild or domestic bird or mammal in the images, you can provide your classification using the options labelled H in the image. This panel will usually contain several lists of relevance to the species that feature in image data from the project for which you are classifying. The default list includes the species most commonly seen in the images. If you don't see the species you're looking for in that list, other lists will include all potential mammals or birds that are likely to be encountered in the area. Click on the list names (at the top of the panel) to explore them. Some lists might span several pages. If you see a species that isn’t in the list, click “Other” and please send us an email at This email address is being protected from spambots. You need JavaScript enabled to view it., telling us what you saw, so that we can update the list.
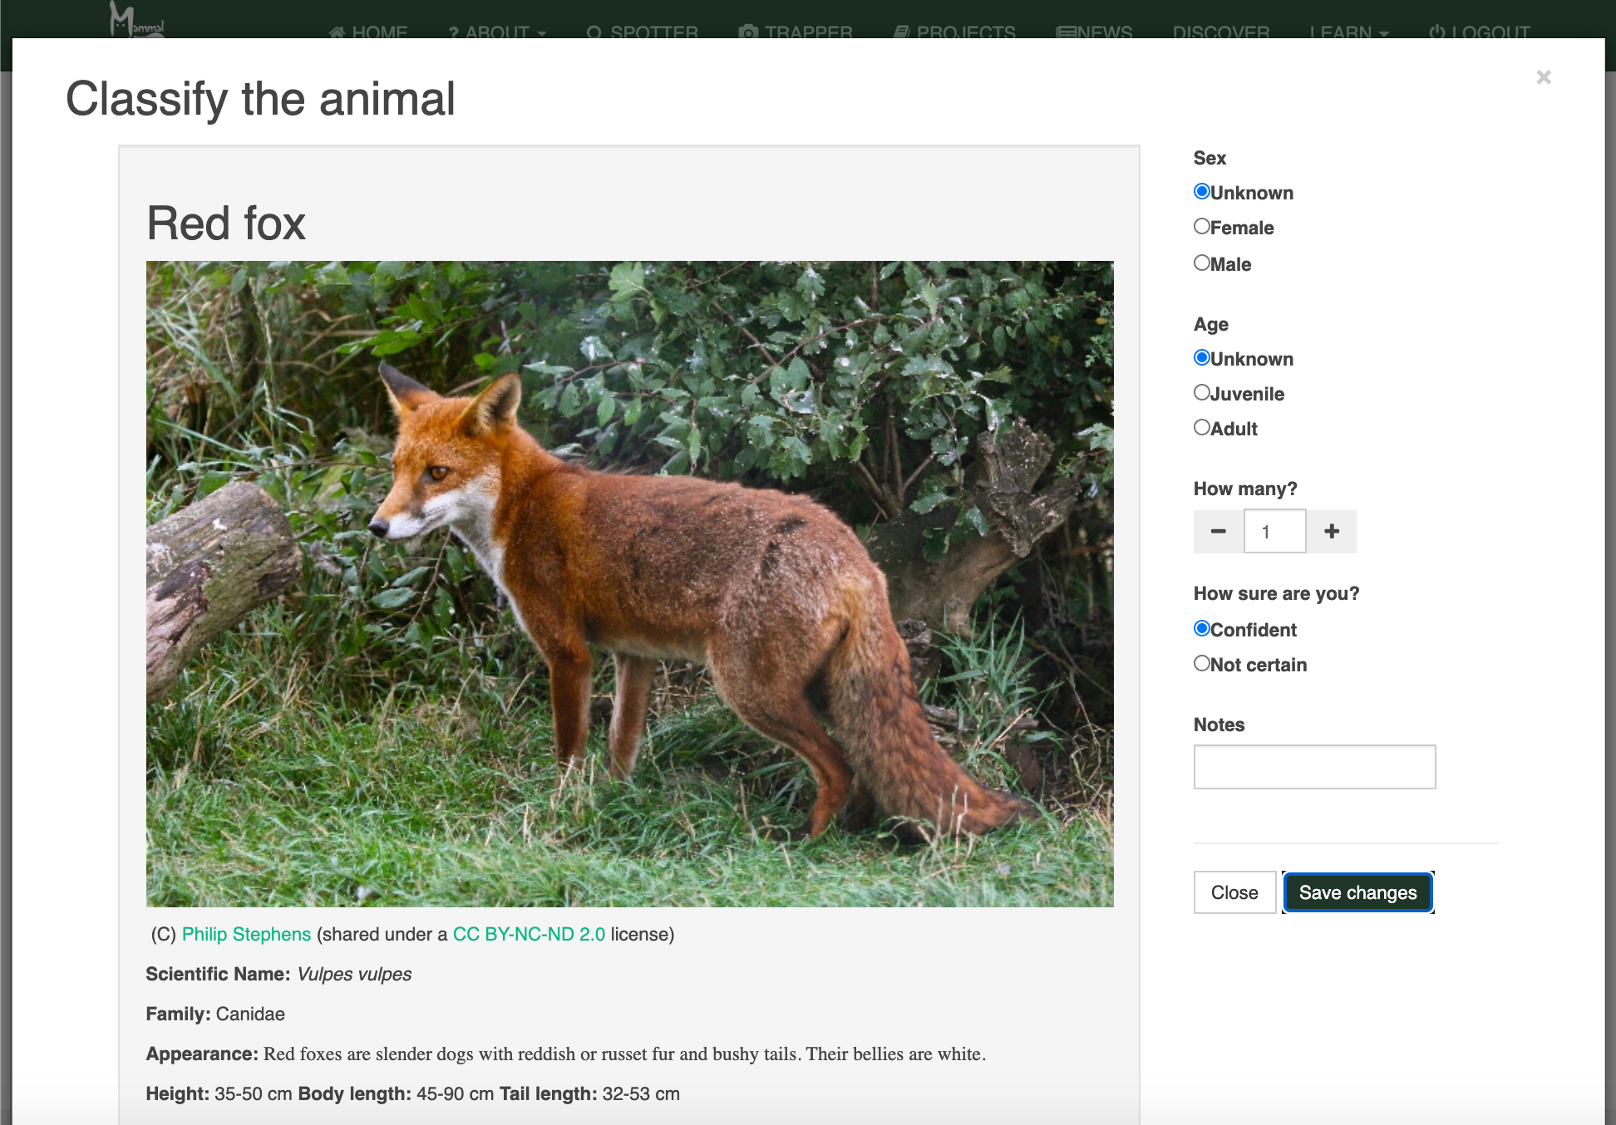
Clicking on the appropriate species in panel H will bring up another box allowing you to specify the sex, age and number of individuals (see picture below). Only use the sex and age options if you are sure; if you aren’t sure of the sex or age, just leave those as the default values of ‘unknown’. If there is more than one individual in view, you can adjust the numbers using the -/+ controls. In this dialogue box, you can also specify if you are not completely sure about the classification (but that it is your best guess), by clicking on "Not certain". Optionally, you can add any notes in the notes field. Once you have finished, click “Save changes”. This will add your classification at the bottom of the displayed image as a tag.
To add multiple species, or different demographic categories (ages or sexes) of animals to your classification, you will need to click on the relevant species for each classification. You should see separate tags below the images you are classifying, one for each species or demographic category within species. If you make a mistake, you can click on the tag at the base of the image to remove it.
If you feel that it is impossible to identify the pictured species (but there’s definitely a bird or mammal in the picture), you can use the “Don’t Know” option from panel H.
Three buttons for further interactions with images are labelled with the letter I:
- if there are problems with the image display or you wish to communicate with us about the image or sequence, for any reason, use the "Information" button (with the i symbol on it) that appears towards the top right of the camera trap image. This will reveal image identifiers that can help us to identify the picture you're referring to, if you contact us.
- if you think a photo is particularly good or interesting, please use the “Favourite” button, which appears at the bottom right of the image and is marked with a thumbs up symbol. This will tag the specific image you are looking at, not the whole sequence.
- if you think a sequence shows humans involved in inappropriate behaviour, please use the "Report" button, which appears at the bottom right of the image, next to the 'favourite' button, and is marked with a flag symbol. You do not need to use this button to report images devoid of wildlife (just classify them as 'Nothing'), images containing dead game birds (these are sometimes used as bait for camera traps, particularly in the Scottish Wildcat project, and do not need to be classified), or images of potentially sick or injured animals (please let us know about these using the Information button to get image details, then email This email address is being protected from spambots. You need JavaScript enabled to view it.).
Finally, once you have looked at all the images in the sequence, you can use the “Next sequence” button at the top right (labelled J) to move on to the next sequence that needs classification.
The process for classifying videos is the same but you will need to use the "Play" button to watch the video and you cannot proceed to the next video or sequence until it has finished playing. Like image sequences, videos also have a Zoom button at the bottom right.
If you have any questions or suggestions, please contact us at This email address is being protected from spambots. You need JavaScript enabled to view it.. Otherwise, thanks – and happy spotting!