
 English (United Kingdom)
  Czech (Čeština)
  Nederlands (nl-NL)
  Magyar
  Deutsch (Deutschland)
  Croatian (Hrvatski)
  Polski (PL)
  Español (España)
 To learn how to be a Spotter and classify camera trap image data on MammalWeb, you can refer to our video about How to be a Spotter. More details follow.
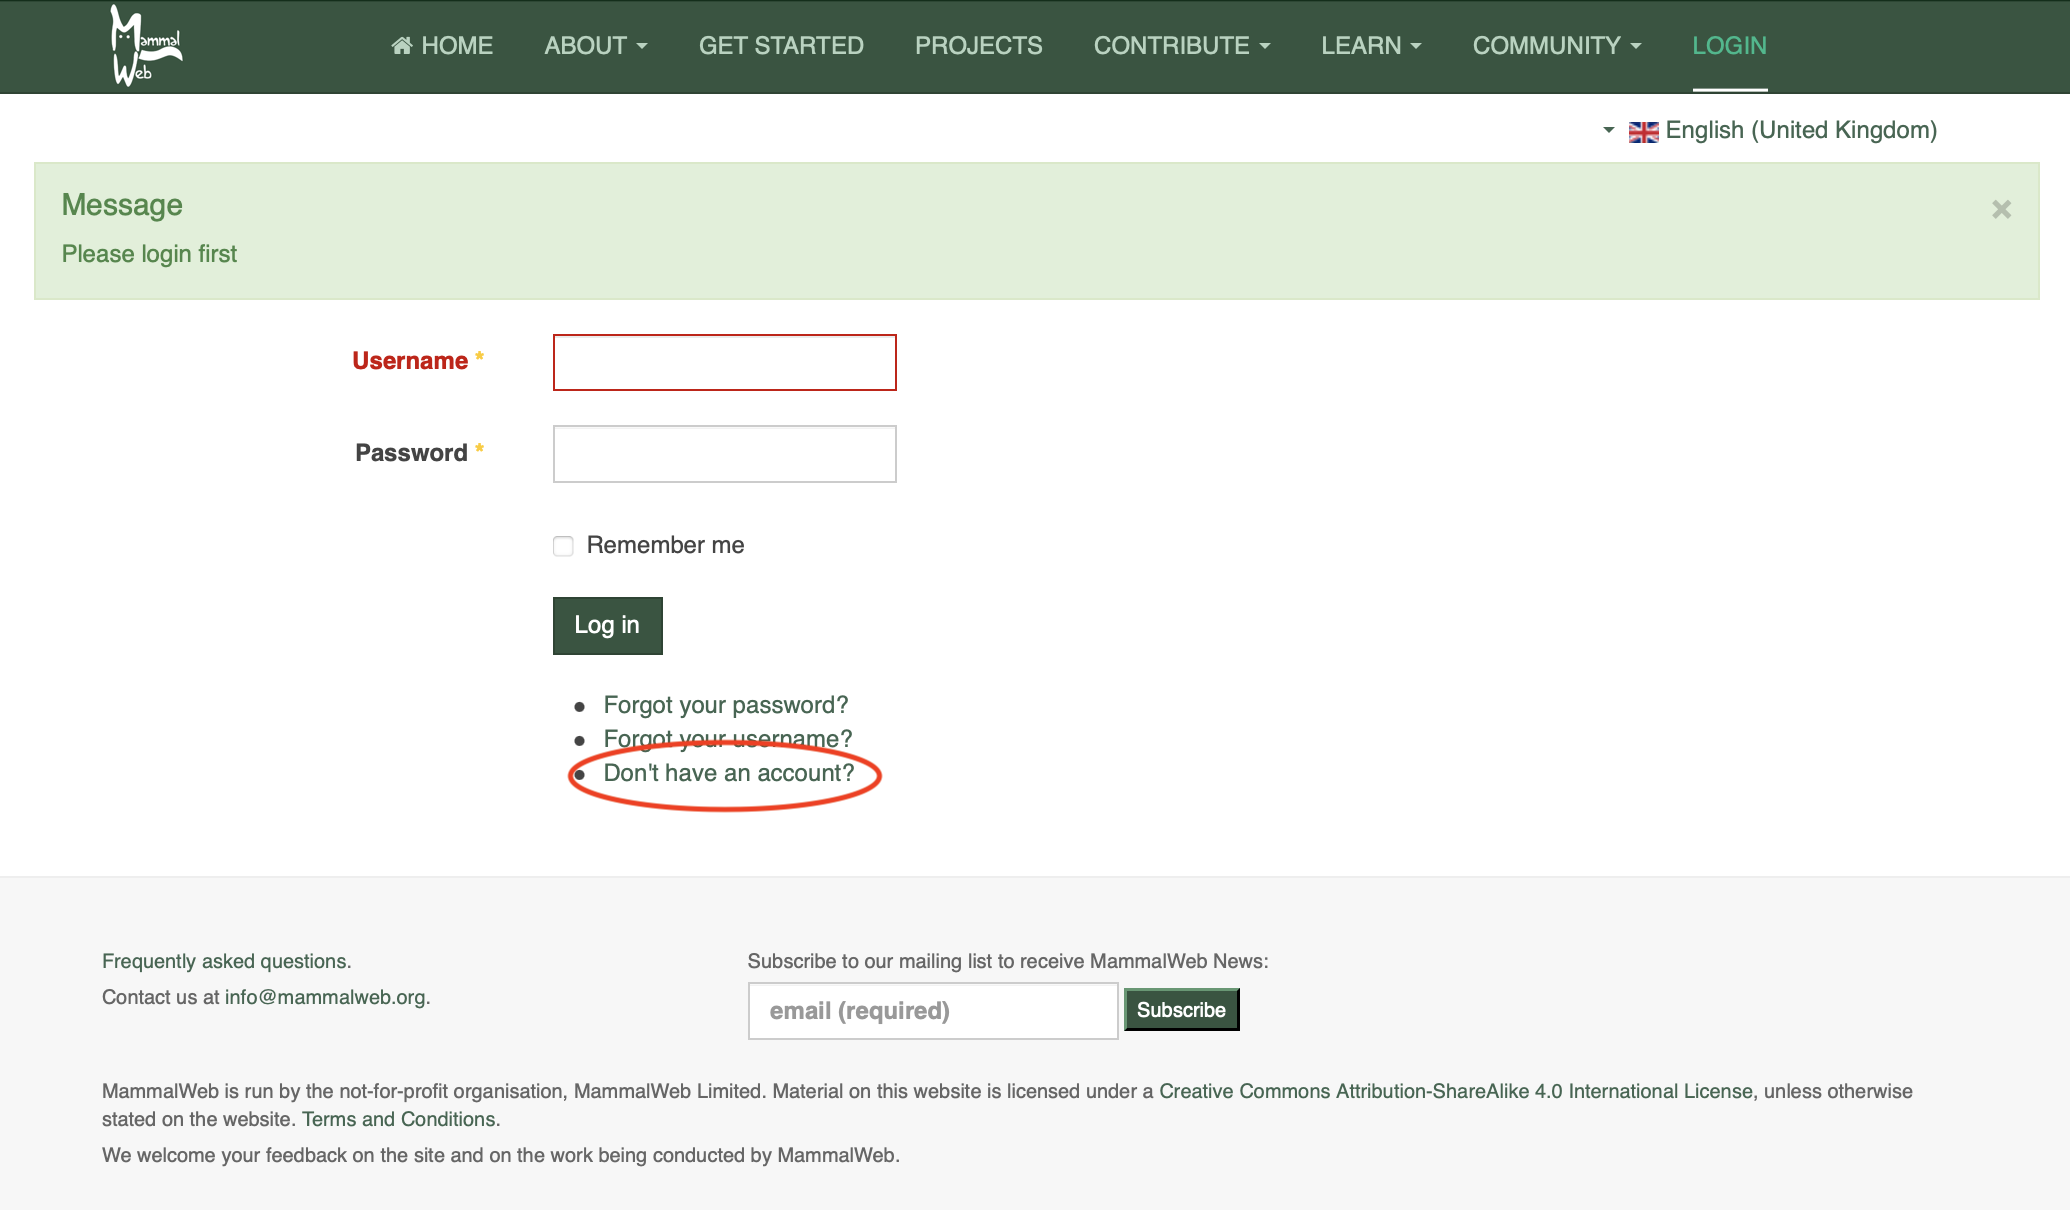
To be a Spotter, you need to register an account. You can do that via any item under the Contribute menu, the first time you visit any of the links under that menu. You will need to follow the link to “Don’t have an account”, highlighted below.
This will take you through to the registration page. Fill in the details required and click on “Register”. For more information, see our video about How to Register.
Once you have an account, you can log in. You should see a Spotter welcome screen like the one pictured below. This gives some basic statistics on the number of photos and Spotters in the system, as well as some indication of your contribution (the number of classifications you have submitted, for example). There will also be an image chosen at random from among those that you have “Favourited” (or, if you have yet to “Favourite” an image, from a default list). That image will vary among visits, especially as the number of photos you have “Favourited” increases.
The most important feature of the Spotter welcome screen is the set of buttons that allow you to select the set of images you would like to classify. That is highlighted in the picture with a red ellipse.
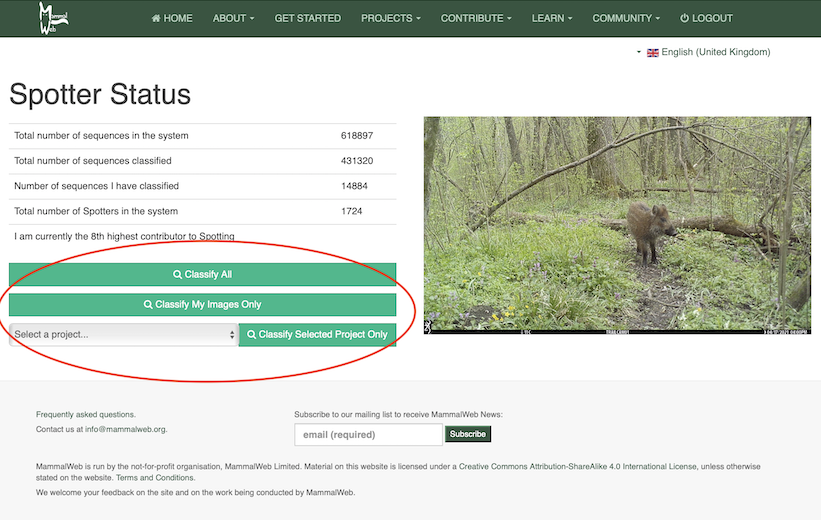
You can choose to classify any publicly-available images in the database (“Classify All”), only those that you have uploaded (“Classify my images only”), or those from a specific collection within the overall database (in which case, you will need to select a project from the drop-down list, and choose “Classify selected project only”). Note that you can also follow the Projects link in the top menu bar to browse projects to which to contribute classifications. More information about projects and project access can be found on the Learn page. If you are also a Trapper and have already uploaded some images, you might like to “Classify my images only”. Note, however, that it usually takes 10 minutes or so before images you have uploaded are ready to be classified.
Whichever option you choose, the Spotting process is the same. It starts with a screen like that pictured below. The question posed on the Spotting screen is “What do you see in this sequence?”. Many camera traps are configured to take a series of photos whenever they are triggered. These naturally form a sequence, usually of one or a group of animals. Sometimes, the same animal(s) may cause the camera trap to trigger repeatedly; MammalWeb assumes that these images will feature the same animal(s), and so will group them into longer sequences. It is also possible that some media are uploaded as videos, so a video might appear in the frame in which the photos normally appear. We are interested to know how many animals and of what species are pictured in any sequence or video.
To determine what’s in the sequence, you can flick through it using the keyboard arrow keys, the ‘advance’ and ‘go back’ indicators (labelled A in the picture below), or the ‘sequence length’ indicators (labelled B below). To zoom in to the image and view it full-screen, use the zoom tool labelled C. To get a better idea of where the picture was taken, click the Location button (labelled D). Take a careful look at the images and satisfy yourself that you know what’s pictured, how many there were and – if possible – their sex and age (only given as adult or juvenile; the latter can be used for clear “young of the year” for many mammals – but don’t use it if you are uncertain).
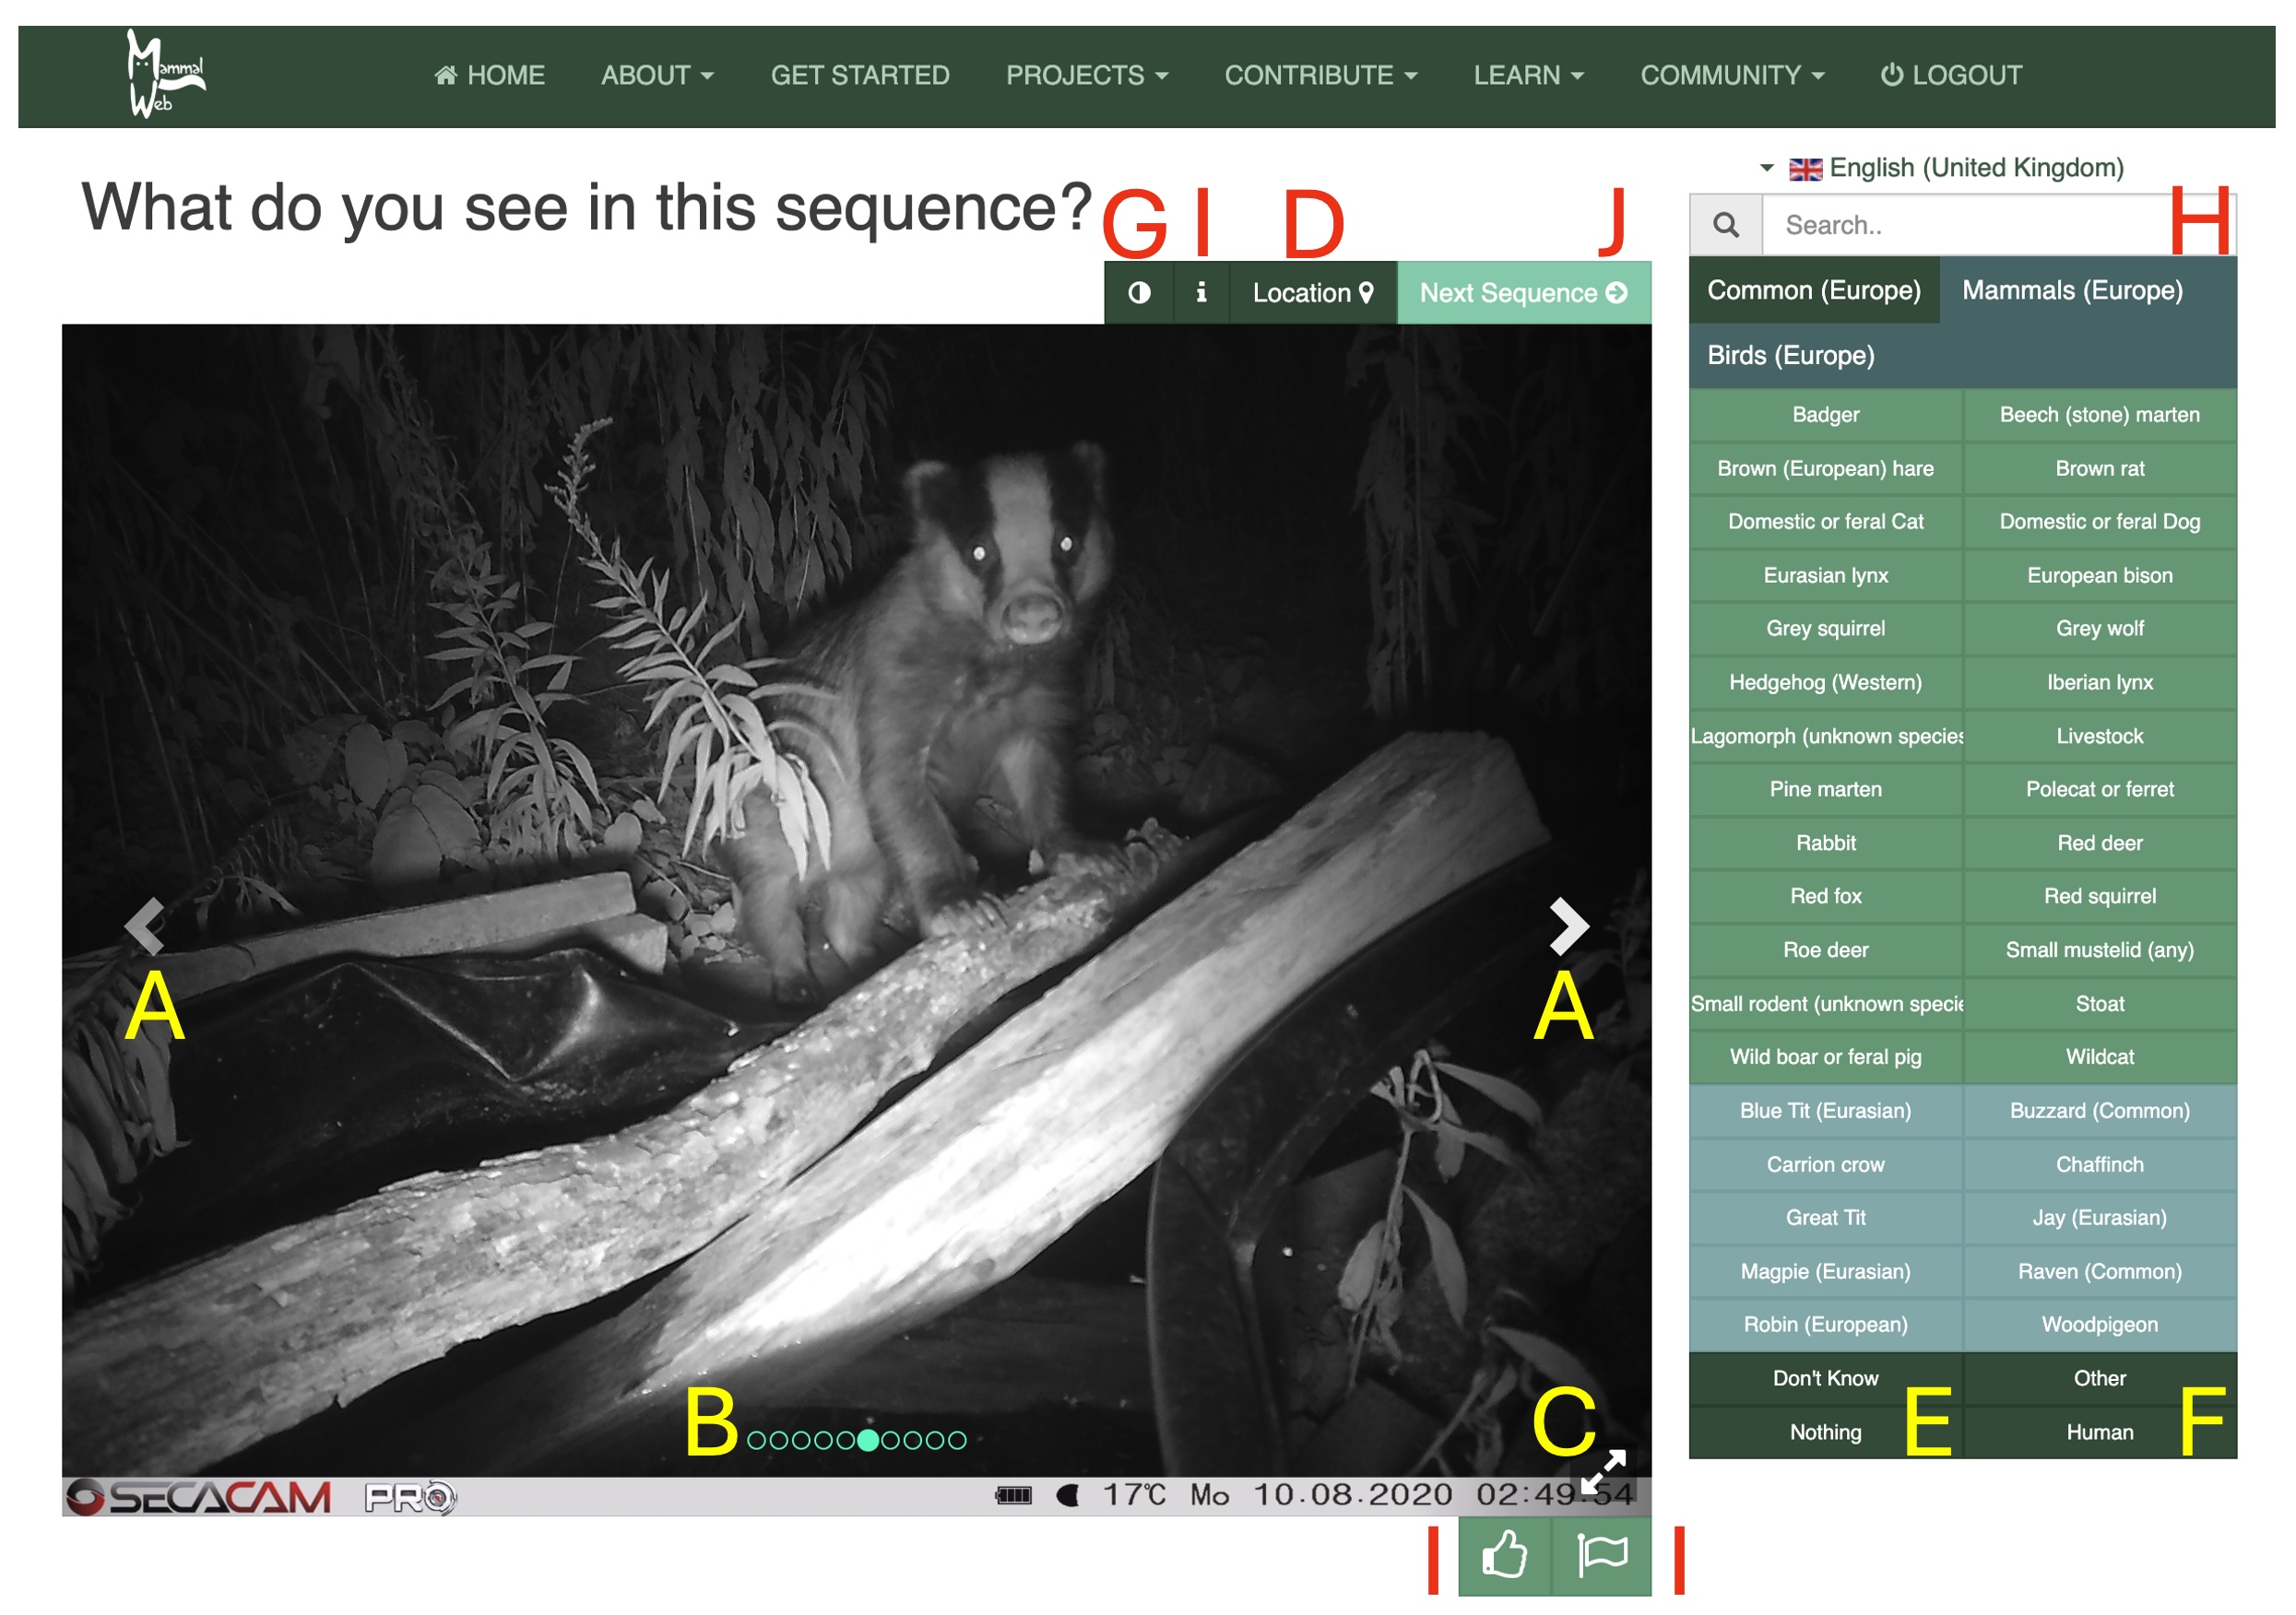
If the image sequence contains no wild or domestic birds or mammals, or if the sequence contains a human being, please use the “Nothing” or “Human” buttons at the bottom right (labelled E and F) to identify that. Images containing humans will not be shown again once they have been flagged. Sometimes, it can help to pick out the outline of an animal if you invert the colour / grey-scale balance in a picture; you can do that using the button labelled G. Assuming there is a wild or domestic bird or mammal in the images, you can provide your classification using the options labelled H in the image. This panel will usually contain several lists of relevance to the species that feature in image data from the project for which you are classifying. The default list includes the species most commonly seen in the images. If you don't see the species you're looking for in that list, other lists will include all potential mammals or birds that are likely to be encountered in the area. Click on the list names (at the top of the panel) to explore them. Some lists might span several pages. If you see a species that isn’t in the list, click “Other” and please send us an email at This email address is being protected from spambots. You need JavaScript enabled to view it., telling us what you saw, so that we can update the list.
Clicking on the appropriate species in panel H will bring up another box allowing you to specify the sex, age and number of individuals (see picture below). Only use the sex and age options if you are sure; if you aren’t sure of the sex or age, just leave those as the default values of ‘unknown’. If there is more than one individual in view, you can adjust the numbers using the -/+ controls. In this dialogue box, you can also specify if you are not completely sure about the classification (but that it is your best guess), by clicking on "Not certain". Optionally, you can add any notes in the notes field. Once you have finished, click “Save changes”. This will add your classification at the bottom of the displayed image as a tag.
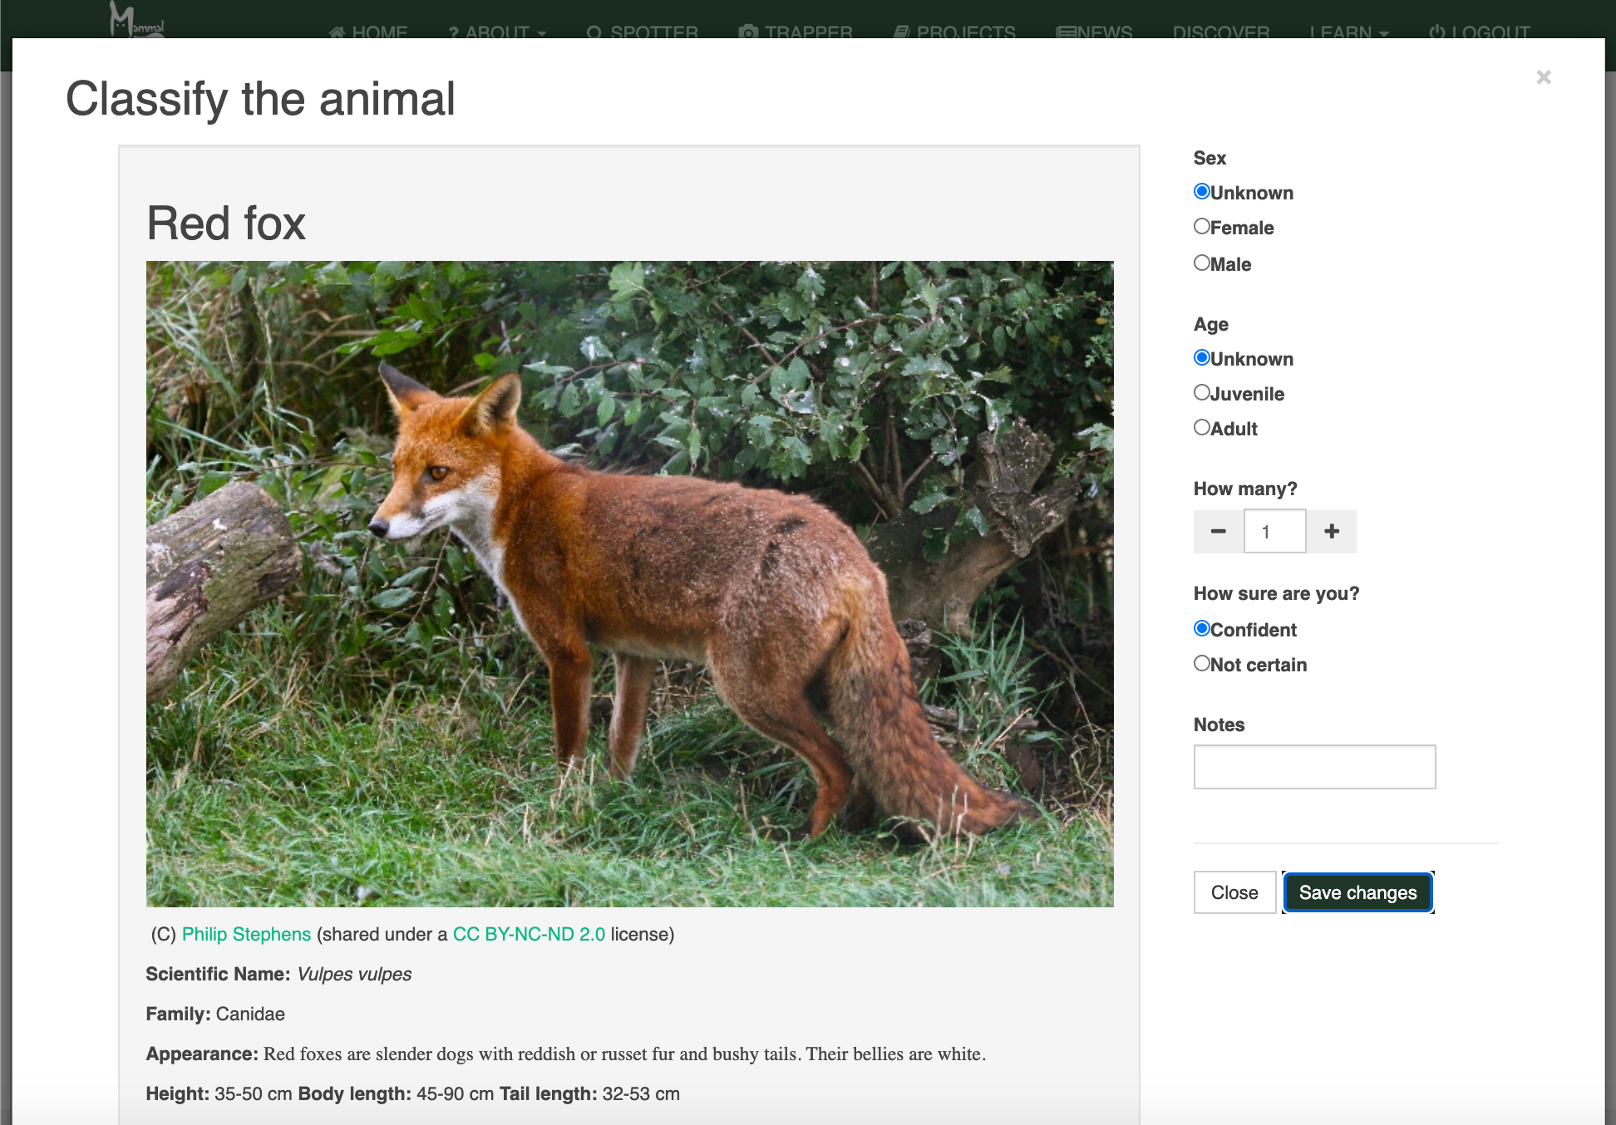
To add multiple species, or different demographic categories (ages or sexes) of animals to your classification, you will need to click on the relevant species for each classification. You should see separate tags below the images you are classifying, one for each species or demographic category within species. If you make a mistake, you can click on the tag at the base of the image to remove it.
If you feel that it is impossible to identify the pictured species (but there’s definitely a bird or mammal in the picture), you can use the “Don’t Know” option from panel H.
Three buttons for further interactions with images are labelled with the letter I:
- if there are problems with the image display or you wish to communicate with us about the image or sequence, for any reason, use the "Information" button (with the i symbol on it) that appears towards the top right of the camera trap image. This will reveal image identifiers that can help us to identify the picture you're referring to, if you contact us.
- if you think a photo is particularly good or interesting, please use the “Favourite” button, which appears at the bottom right of the image and is marked with a thumbs up symbol. This will tag the specific image you are looking at, not the whole sequence.
- if you think a sequence shows humans involved in inappropriate behaviour, please use the "Report" button, which appears at the bottom right of the image, next to the 'favourite' button, and is marked with a flag symbol. You do not need to use this button to report images devoid of wildlife (just classify them as 'Nothing'), images containing dead game birds (these are sometimes used as bait for camera traps, particularly in the Scottish Wildcat project, and do not need to be classified), or images of potentially sick or injured animals (please let us know about these using the Information button to get image details, then email This email address is being protected from spambots. You need JavaScript enabled to view it.).
Finally, once you have looked at all the images in the sequence, you can use the “Next sequence” button at the top right (labelled J) to move on to the next sequence that needs classification.
The process for classifying videos is the same but you will need to use the "Play" button to watch the video and you cannot proceed to the next video or sequence until it has finished playing. Like image sequences, videos also have a Zoom button at the bottom right.
If you have any questions or suggestions, please contact us at This email address is being protected from spambots. You need JavaScript enabled to view it.. Otherwise, thanks – and happy spotting!